Dollar Tree Mirror DIY with Etched Glass & Shelf Upgrade
As an Amazon Associate and member of other affiliate programs, I earn from qualifying purchases.
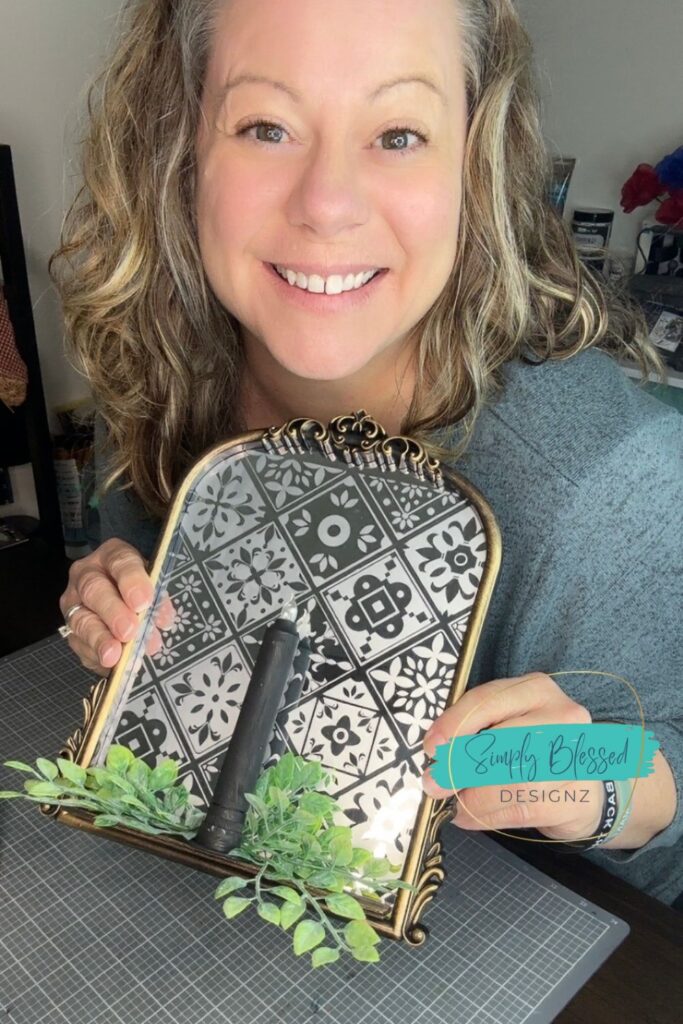
This Dollar Tree Mirror DIY is one of my favorite flips so far. It’s quick, affordable, and makes such a beautiful statement. If you’ve been wanting to try glass etching, this is the perfect beginner project!
There’s something so rewarding about turning the ordinary into something special. With just a few simple supplies, I transformed a $1.25 Dollar Tree mirror into boutique-style decor — complete with etched glass, a shelf for a candle, and a cozy farmhouse feel.
Why I Love This Dollar Tree Mirror DIY
When I saw this mirror at Dollar Tree, I instantly knew I could give it a high-end look on a shoestring budget. I pulled out my Armour Etch, used a tile-style transfer I had on hand, and added a tongue depressor as a shelf — yes, you read that right!
This project reminded me of how God takes simple things and makes them beautiful — just like us. Sometimes, a little time and intention brings out the shine that was always there.
Dollar Tree Mirror DIY: What You’ll Need:
- 1 Dollar Tree mirror
- Armour Etch cream
- Terrific Tile-pattern transfer
- Painter’s tape
- Gloves + plastic scraper
- Tongue depressor (Dollar Tree or craft store)
- B7000 glue (strong and flexible hold)
- Faux greenery (Dollar Tree)
- LED emergency candle (Dollar Tree)
How to Make This Dollar Tree Mirror DIY: Step-by-Step
1. Clean the Mirror Thoroughly
Wipe it down to remove dust and oils — Armour Etch needs a clean surface to work properly.
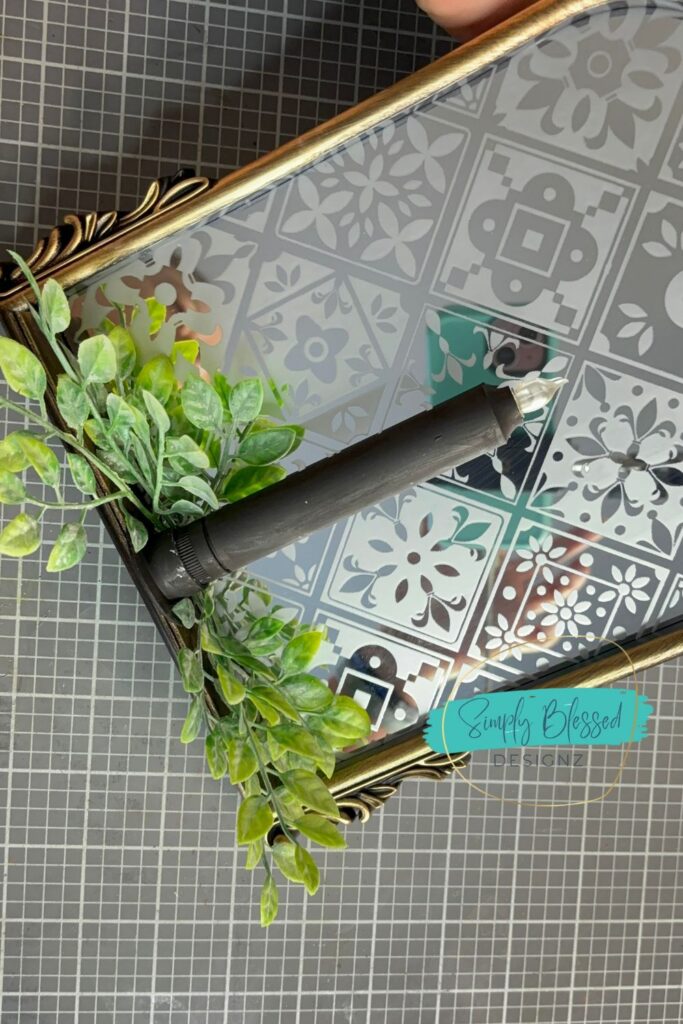
2. Apply the Tile Transfer & Etch
Tape your tile-pattern transfer in place. Wearing gloves, spread Armour Etch cream thickly over the open design. Next, let sit for 3–5 minutes (follow bottle instructions), then rinse off completely and peel the transfer.
⚠️ Use Armour Etch in a well-ventilated area and always wear gloves.
3. Add a Mini Shelf
Glue the tongue depressor directly to the bottom of the mirror frame using B7000 glue. Hold in place until tacky and let cure 24 hours for best hold.
4. Style It Up
Wrap some faux greenery around the shelf and nestle in your Dollar Tree LED candle. Instant charm!
How to Style or Gift Your Dollar Tree Mirror DIY
This charming Dollar Tree mirror makeover isn’t just a fun DIY — it’s a versatile piece that can be styled beautifully throughout your home or given as a meaningful handmade gift. Here are a few ideas:
Style It in Your Home:
- Layer it in a gallery wall – Add texture and shine among photos and wall signs.
- Accent a small shelf or mantle – Nestle it behind vases or seasonal decor.
- Brighten up a bathroom – Hang it near a sink or shelf for a soft farmhouse glow.
- Add charm to an entryway – Let it greet your guests with cozy character.
- Use as a nightstand tray accent – Pair with a candle and small floral sprig.
Give It as a Handmade Gift:
- Hostess gift – Pair it with a tea towel or candle.
- New home welcome – Tuck it into a basket with greenery and treats.
- Mother’s Day or birthday – Add a handwritten tag with a scripture or note.
- Thank you gift – A beautiful gesture for teachers, nurses, or friends.
- Craft fair or market booth item – These are eye-catching and cost-effective to make in batches.
A Faith-Filled Take on This Dollar Tree Mirror DIY
This project reminded me of Proverbs 31:25:
“She is clothed with strength and dignity; she can laugh at the days to come.”
Just like we took this little mirror and made it into something strong, beautiful, and full of purpose — you, too, are designed for joy, no matter your starting point.
What Do You Think About This Dollar Tree Mirror DIY?
Have you ever looked at something simple — like a Dollar Tree mirror — and imagined what it could become? I’d love to know:
Would you try this etched glass technique or mini shelf idea?
Have you used Armour Etch before, or is this your first time seeing it in action?
I always say you don’t need fancy tools or a big budget to create something beautiful — you just need the courage to start. 💛
👉 If you give this project a try, tag me @SimplyBlessedDesignz on Facebook or Instagram. I love seeing your creations and sharing your creativity with our community!
Try Another DIY Like This One
If you enjoyed this project, I think you’ll love this one too:
DIY Crackled Cookbook Stand with Eucalyptus Chicken Transfer
It’s another beginner transformation with a charming farmhouse finish — and perfect for gift-giving or for your kitchen counter!
💌 Subscribe to my website for FREE weekly emails!
Click here to subscribe for FREE!
I’ll send you a little encouragement, creative inspiration, new podcast episodes, and all the latest happenings from SimplyBlessedDesignz — straight to your inbox! 🌷✨
About the Host

Hey sweet friend — I’m Ashley, the heart behind SimplyBlessedDesignz and the voice of Unscripted Conversations.
I’m a faith-filled creative who believes in Jesus, Dollar Tree flips, and showing up even when life gets messy. Whether I’m podcasting, crafting, or cooking something from scratch, my prayer is always the same: that you leave here encouraged and reminded you’re never alone.
Grab your coffee, pull up a chair, and let’s do this life—one grace-filled day at a time. 💛