Elegant Dollar Tree Pumpkin Frame DIY
As an Amazon Associate and member of other affiliate programs, I earn from qualifying purchases.
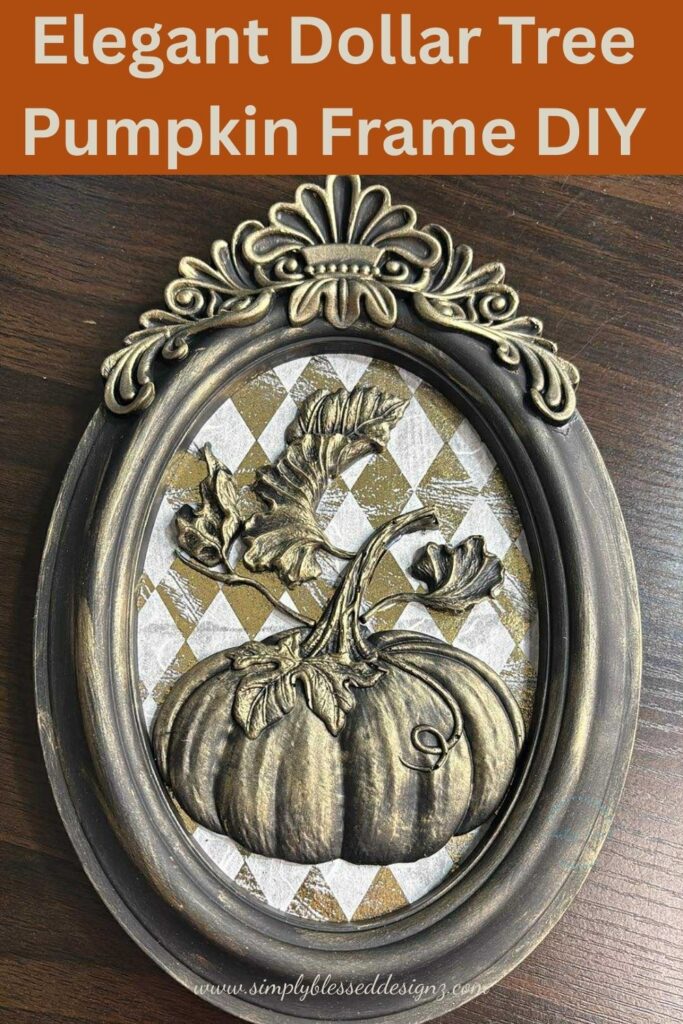
Y’all… this Elegant Dollar Tree Pumpkin Frame DIY is giving boutique vibes on a thrift budget — and I am here for it! I grabbed one of those viral gold frames from Dollar Tree and paired it with some gorgeous resin pumpkins my sweet friend Teri Lightsey sent me. She poured them using quick-set resin and her IOD mould, and let me tell you — they are perfect for this project.
A little paint, some gold harlequin rice paper, and a swipe of my favorite Finnabair Metallique Wax magic, and now I’ve got a high-end fall piece that looks like I spent way more than a few bucks. Grab your glue, your paintbrush, and maybe your favorite fall playlist, and let’s make something pretty together.
Elegant Dollar Tree Pumpkin Frame DIY – Materials You’ll Need
- Dollar Tree gold frame (oval style)
- Gesso (white or clear) for priming the frame
- Black matte acrylic paint
- AB Studio gold harlequin rice paper
- Decoupage varnish + glue
- Black resin pumpkins and leaves (or similar embellishments)
- Finnabair Metallique Wax in White Gold
- Paintbrushes and a small detail brush
Elegant Dollar Tree Pumpkin Frame DIY – Step-by-Step Tutorial
Prepping the Frame
Start by popping out the insert and giving that frame a quick wipe down. Then, give it a coat of Gesso. This step helps the paint grip better and gives you a nice, even base to work with.
Adding the Black Base Coat
Once the Gesso is dry, brush on a thin coat of black matte acrylic paint. Instantly, that dollar frame is ready to look bougie.
Adding the Harlequin Magic
Cut your AB Studio gold harlequin rice paper to size. Use decoupage glue to lay it down on the insert — smooth it gently so it doesn’t wrinkle. Instant elegance, y’all.
Pumpkins & Pretty Details
Glue those resin pumpkins and leaves right where you want them. These beauties? My sweet friend Teri Lightsey poured them for me using quick-set resin and her IOD mould — and y’all, they are perfect for this project. Let them dry completely so they stay put while you add the finishing touches.
Metallic Wax for the Win
Here’s where the magic happens — my favorite Finnabair Metallique Wax in White Gold (affiliate link here). Just a light swipe over the raised edges of the frame and those pumpkins, and suddenly this project looks like it belongs in a boutique.
Watch me create this elegant dollar tree Pumpkin frame
Want to watch this project step-by-step?
Check out my full video tutorial here:

Display Your Masterpiece
Pop the insert back in, find that perfect spot, and show it off. Mine is sitting pretty on my entryway table, and it’s already catching compliments from everyone who walks in.
Elegant Dollar Tree Pumpkin Frame DIY Tips & Tricks
- Use Gesso to prep surfaces anytime you want your paint and wax to stick beautifully.
- Build up the metallic wax slowly for a softer, layered shimmer.
- Try other wax colors like copper or vintage gold for a different look.
- These make amazing gifts — teacher appreciation, hostess gifts, or even something for your bestie’s fall mantel.
Coming soon — check back for these fun projects:
- DIY Projects Archive – Explore more fun, budget-friendly projects.
- Dollar Tree Glass Pumpkin Makeover
- DIY Fall Door Round with Navy and Copper
- Fall Home Décor on a Budget
Pin This Elegant Dollar Tree Pumpkin Frame DIY & Let’s See Yours!
About the Host

Hey sweet friend — I’m Ashley, the heart behind SimplyBlessedDesignz and the voice of Unscripted Conversations.
I’m a faith-filled creative who believes in Jesus, Dollar Tree flips, and showing up even when life gets messy. Whether I’m podcasting, crafting, or cooking something from scratch, my prayer is always the same: that you leave here encouraged and reminded you’re never alone.
Grab your coffee, pull up a chair, and let’s do this life—one grace-filled day at a time. 💛